How Do I Clean My Air Fryer?
Your air fryer is one of those kitchen heroes that makes cooking faster and easier. But let’s be real—nobody loves thinking about air fryer maintenance and cleaning. The good news? It’s way simpler than you think. I’m going to walk you through every step of cleaning your air fryer properly, keeping it running strong, and making sure your food tastes amazing every single time you use it.
In this article
Why You Need to Clean Your Air Fryer Regularly
Before we dive into the how, let’s talk about why this matters. Your air fryer basket collects food bits, grease buildup, and crumbs every time you cook. When these things pile up, they burn onto the surface and create smoke. This burnt stuff can affect the taste of your food and even damage the non-stick coating over time.
A clean air fryer basket also cooks better. When grease builds up, the heat can’t reach your food evenly. You’ll end up with some spots that are crispy and other spots that are soggy. That’s not what you want. Plus, keeping your air fryer clean means it lasts longer and works better.
Think of it like this: your air fryer is your kitchen buddy, and it needs a little love to keep working its best. Regular cleaning takes maybe five to ten minutes, and it’s the easiest way to get the most out of your investment.
What You’ll Need to Clean Your Air Fryer
You probably have most of these things already. You don’t need fancy or expensive supplies to get your air fryer spotless.
Start with hot water. This is your best friend when it comes to air fryer cleaning. You’ll also want some dish soap—just the regular kind you use for washing dishes. A soft sponge or cloth works great for wiping things down. Avoid anything too rough or scratchy because you don’t want to damage the non-stick surface.
Grab a soft brush or an old toothbrush for getting into small corners. A plastic scraper is helpful for removing stuck-on food, but make sure it’s soft plastic, not metal. Metal can scratch and ruin your air fryer basket.
For tough, stuck-on messes, keep some baking soda nearby. Vinegar also works well for cutting through grease. Both are safe, natural, and you probably have them in your kitchen already.
That’s really it. You don’t need special air fryer cleaning products or sprays. Those everyday items work just fine.
The Step-by-Step Process for Basic Air Fryer Cleaning
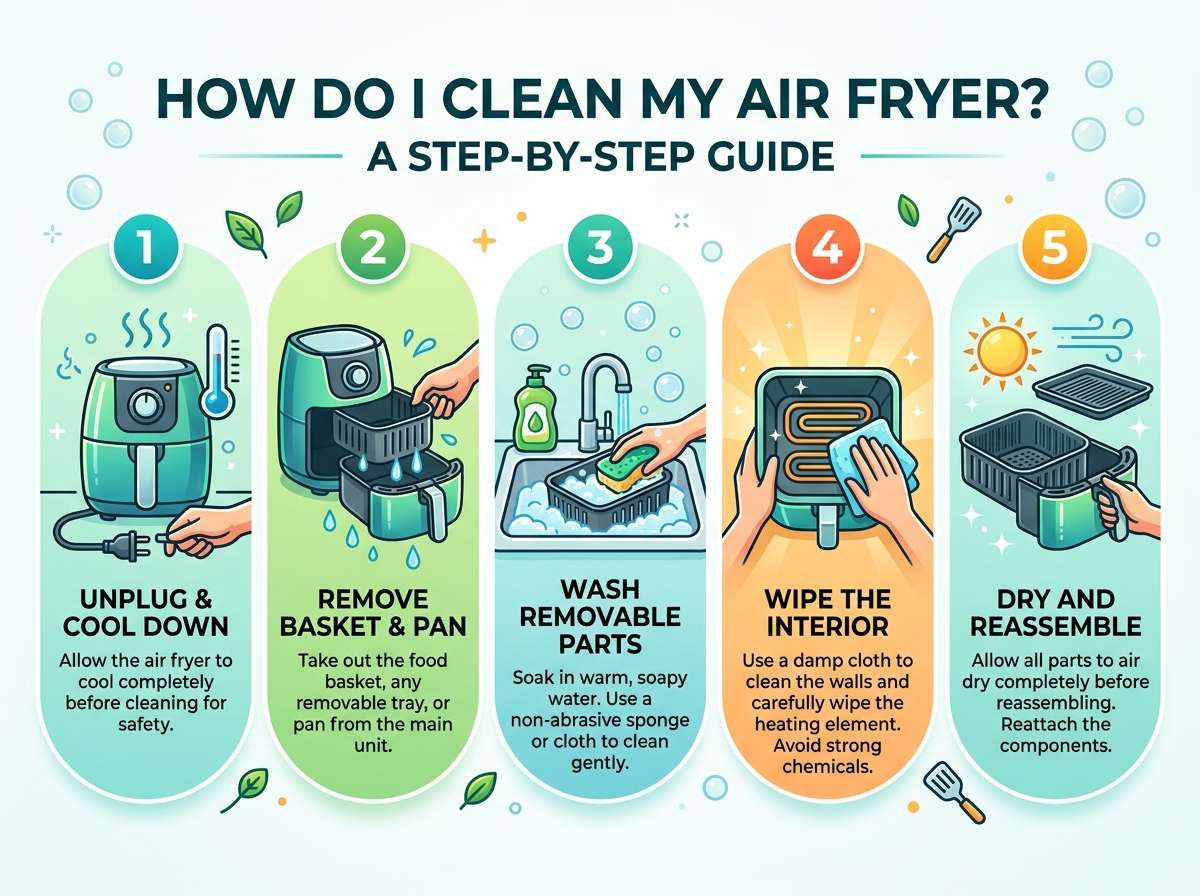
Step One: Let It Cool Down
This is super important. Never clean your air fryer while it’s hot. Always wait until it cools down completely. This keeps you safe and makes the job easier. Hot air fryer baskets are dangerous to touch, and the heat can make grease stick harder to the surface.
Let your air fryer sit for at least thirty minutes after you finish cooking. If you cooked something especially greasy, give it more time to cool.
Step Two: Remove the Basket and Tray
Most air fryers have a basket that pulls out easily. Some models also have a removable tray underneath that catches grease. Take these out and set them aside on a clean counter or over the sink.
If your air fryer model doesn’t have a removable basket, don’t worry. You can still clean it while it’s in the machine, but you’ll need to be more careful.
Step Three: Empty Out the Loose Bits
Before you use any water, tap the basket gently over a trash can to get rid of loose crumbs and food bits. This prevents those pieces from going down your drain and clogging things up. You might be surprised how much stuff comes out.
If there’s visible grease pooled in the tray underneath, carefully pour it into a container and throw it away. Never pour grease down the drain because it clogs pipes.
Step Four: Soak the Removable Parts
Fill your sink or a large bowl with hot water and add a squirt of dish soap. Put your basket and tray in the soapy water and let them soak for ten to fifteen minutes. This gives the hot water time to loosen up all the stuck-on food and grease.
While they’re soaking, you can move on to cleaning the main body of the machine.
Step Five: Wipe Down the Main Body
Take a damp cloth or sponge and wipe the outside and inside of your air fryer. Use only a slightly damp cloth—you don’t want water dripping inside the machine. If there’s a heating element on top, be gentle around that area.
For the inside walls, wipe away any grease or food spots. A slightly damp cloth works better than a soaking wet one. If you see stubborn grease, let your cloth soak in hot soapy water for a minute, then wipe again.
Step Six: Scrub the Basket and Tray
Pull your basket and tray out of the soapy water. Use a soft sponge or cloth to scrub both sides of the basket. Pay special attention to the corners and crevices where grease likes to hide.
For stuck-on food that won’t come off easily, try this trick. Make a paste with baking soda and a little water. Rub this paste on the stuck spots and let it sit for a few minutes. Then scrub gently. The paste loosens stubborn food without scratching the non-stick coating.
If you have a soft brush or old toothbrush, use it to get into the small holes and corners of the basket. These spots collect grease that’s hard to reach with a regular sponge.
Step Seven: Rinse Everything Thoroughly
Rinse the basket and tray under running water until all the soap is gone. Soap residue can affect the taste of your food, so don’t skip this step. Make sure you rinse both the tops and bottoms of these pieces.
For extra clean rinsing, hold them under the water and use your fingers to wipe away any remaining soapy residue. If you see any spots you missed, give them another quick scrub.
Step Eight: Dry Everything Completely
This step is just as important as washing. Use a clean towel to dry the basket, tray, and any other removable parts. Make sure everything is dry before you put these pieces back in the machine.
Wet parts can cause problems with your air fryer and might even damage it. Take your time with this step and make sure no water is dripping from anything.
Step Nine: Put Everything Back Together
Once everything is dry, put the basket and tray back into your air fryer. Make sure they fit snugly and sit in the right position. Check the instruction manual if you’re not sure about the exact placement.
Now your air fryer is clean and ready to use again!
How to Handle Tough, Stuck-On Messes
Sometimes you’ll run into food that’s really stuck on. Maybe something boiled over or you left a greasy coating for too long. Here’s how to handle those tough situations.
The baking soda paste method works great for this. Mix baking soda with just enough water to make a thick paste. Spread this on the stuck areas and let it sit for five to ten minutes. The baking soda gets into the burned spots and loosens them up. Then scrub gently with a soft sponge and rinse well.
If baking soda doesn’t work, try white vinegar. Soak a cloth in vinegar and lay it on the stuck spot for a few minutes. Vinegar is acidic and cuts through grease really well. Then scrub and rinse.
For really stubborn spots, combine both methods. Apply the baking soda paste first, let it sit, then spray or wipe vinegar on top. The two ingredients work together to break down tough residue. Let this sit for another five minutes, then scrub gently.
Here’s something important: never use metal scrapers or harsh scrubbing pads on your basket. These will damage the non-stick coating and ruin your air fryer. Stick with soft sponges, plastic scrapers, and gentle scrubbing. A little patience goes a long way.
Tips for Keeping Your Air Fryer Cleaner Between Uses
You can make cleaning easier by preventing heavy buildup in the first place. Here are some simple tricks.
Line your air fryer basket with parchment paper. You can buy parchment paper designed for air fryers, or you can cut up regular parchment paper from the grocery store. This catches grease and prevents it from sticking to the basket. After you cook, you just throw away the paper and your basket stays clean.
Don’t overfill your basket. When you pack too much food in there, grease can’t drip through properly and builds up on the sides. Cook in smaller batches if you need to. Your food will cook better anyway because the hot air can circulate around each piece.
Pat your food dry before cooking. Extra moisture on meat or vegetables leads to more splattering and grease buildup. Use a paper towel to dry off your ingredients before they go in the air fryer.
Try cooking fattier foods in smaller amounts. Things like bacon and sausages produce a lot of grease. Cook them in smaller batches or let some of the grease drip out before cooking more.
Empty the grease tray after every use. Don’t wait for it to get full. A quick empty keeps grease from building up and hardening.
The Deep Clean: What to Do Every Month or Two
Beyond regular cleaning, your air fryer needs a deeper clean once in a while. This removes buildup you might have missed and keeps everything working perfectly.
Start by doing the regular cleaning process. Get your basket, tray, and inside walls all clean. Now let’s go deeper.
Take a damp cloth and focus on the heating element and the areas around it. You can see grease and residue there sometimes. Wipe gently—never scrub the heating element itself. Just wipe the areas around it carefully.
Check the fan area if your air fryer has a visible fan. There might be dust or grease buildup there. Use a soft brush to gently clean these spots. Be very careful not to bend or damage the fan.
Look at the rubber seals and gaskets. These sometimes collect grease and debris. Wipe them with a damp cloth to keep them clean. Clean seals help your air fryer work better and last longer.
If your air fryer has a removable tray for catching grease, pay special attention to it. Sometimes grease gets stuck in the corners or crevices. Use your soft brush to clean these spots. The tray needs to be completely clean so grease drips into it properly next time you cook.
Common Air Fryer Cleaning Mistakes to Avoid
People make the same mistakes over and over, so let me help you avoid them.
Don’t use water to clean the main machine while it’s plugged in. Always unplug your air fryer before cleaning it. This keeps you safe and protects your machine.
Don’t submerge the entire air fryer body in water. This is dangerous and can damage the electrical parts. Only clean the parts that are meant to be removed and washed.
Don’t use metal scrubbers or metal utensils on your basket. These scratch the non-stick coating. Stick with soft sponges and plastic tools.
Don’t use harsh chemicals or abrasive cleaners. These can damage the non-stick coating and leave chemical residue on your food. Stick with dish soap, baking soda, and vinegar.
Don’t forget to dry things completely before putting them back. Water and electricity don’t mix, and wet parts can cause problems.
Don’t ignore grease buildup. Clean your air fryer regularly so grease doesn’t get hard and difficult to remove.
Don’t cook the same thing right after cleaning without testing it first. If any soap residue is left, you’ll taste it. Run the air fryer empty for a minute or two to make sure everything is good.
Different Air Fryer Models and Special Considerations
Most air fryers work the same way when it comes to cleaning, but some models have special features you should know about.
If your air fryer has a flip-up or fold-down basket design, just follow the same steps. Remove it, soak it, and scrub it like a regular basket.
For digital air fryers with fancy controls and displays, keep the outside clean by wiping it with a barely damp cloth. Never spray liquid directly on the control panel.
Double basket air fryers have two baskets that come out separately. Clean each one the same way you’d clean a single basket. Make sure both are dry before putting them back in.
Air fryer ovens are bigger and have more space inside. You can still wipe them down with a damp cloth, and if they have removable racks, you can soak and scrub those the same way as a regular basket.
No matter what kind of air fryer you have, the basic cleaning principles stay the same. Remove what you can, soak it, scrub gently, rinse well, and dry completely.
How Often Should You Clean Your Air Fryer?
Here’s the real answer: it depends on how much you use it.
If you use your air fryer a few times a week, clean the basket and tray after every use. This takes just five minutes and keeps things from getting nasty. Wipe down the inside of the main machine once a week.
If you use your air fryer daily, you might think you need to clean it more often, but honestly, quick cleanings after each use and a deeper clean once or twice a week is enough.
If you use your air fryer just a couple times a month, clean it after each use. Even though you’re not using it often, grease can harden if you wait too long between cleanings.
Do a more thorough deep clean every month or two, no matter how often you use your air fryer. This keeps everything in top shape and prevents buildup you can’t see.
Troubleshooting: When Your Air Fryer Doesn’t Look Clean
Sometimes you clean your air fryer and it still looks dirty. Here are some reasons why and how to fix them.
If you see brown spots that won’t come off, these are usually discoloration from heat, not actual dirt. A little baking soda paste might help, but if they don’t come off, they’re probably permanent and won’t affect how your air fryer works.
If grease keeps coming back to the same spot, make sure the area is completely dry after cleaning. Wet spots can make grease look darker. Also, check that you’re emptying the grease tray every time you cook.
If your basket still smells weird after cleaning, make sure you’ve rinsed away all the soap. Soapy smells usually mean there’s still cleaning residue left. Run a fresh rinse under the water and try again.
If your air fryer seems to be cooking unevenly and you’ve cleaned it, make sure the basket is sitting in the right position. It needs to be in all the way and sitting flat.
If you see smoke coming from your air fryer, it probably means there’s grease buildup that you missed. Clean it more thoroughly and make sure to empty the grease tray completely.
Final Thoughts on Air Fryer Cleaning
Cleaning your air fryer doesn’t have to be a chore. It’s quick, it’s easy, and it keeps your machine working great. All you need is hot water, dish soap, a soft sponge, and a little patience. You don’t need special products or tools.
The key is staying on top of it. Clean after each use if you can, do quick wipe-downs of the main body regularly, and do a deeper clean every month or two. This prevents grease from building up and hardening, which makes everything easier.
Your air fryer is a hardworking kitchen appliance that deserves a little care. When you keep it clean, it cooks better, lasts longer, and your food tastes better. Plus, you’ll avoid smoking and weird smells.
Start with the basic cleaning routine. Do it a couple times and it becomes automatic. You’ll wonder why you ever thought air fryer cleaning was hard. It’s actually one of the easiest kitchen maintenance tasks you can do.
So get in there, give your air fryer some love, and enjoy cooking with a perfectly clean machine. Your taste buds—and your air fryer—will thank you.

Mary is a home cooking enthusiast and kitchen appliance reviewer who loves helping people find the best tools for everyday meals. She enjoys testing air fryers, deep fryers, and other cooking appliances while sharing honest reviews and practical buying advice. Through FryerPick.com, Mary provides expert guides, product comparisons, and cooking tips to help readers choose the right fryer for their kitchen.