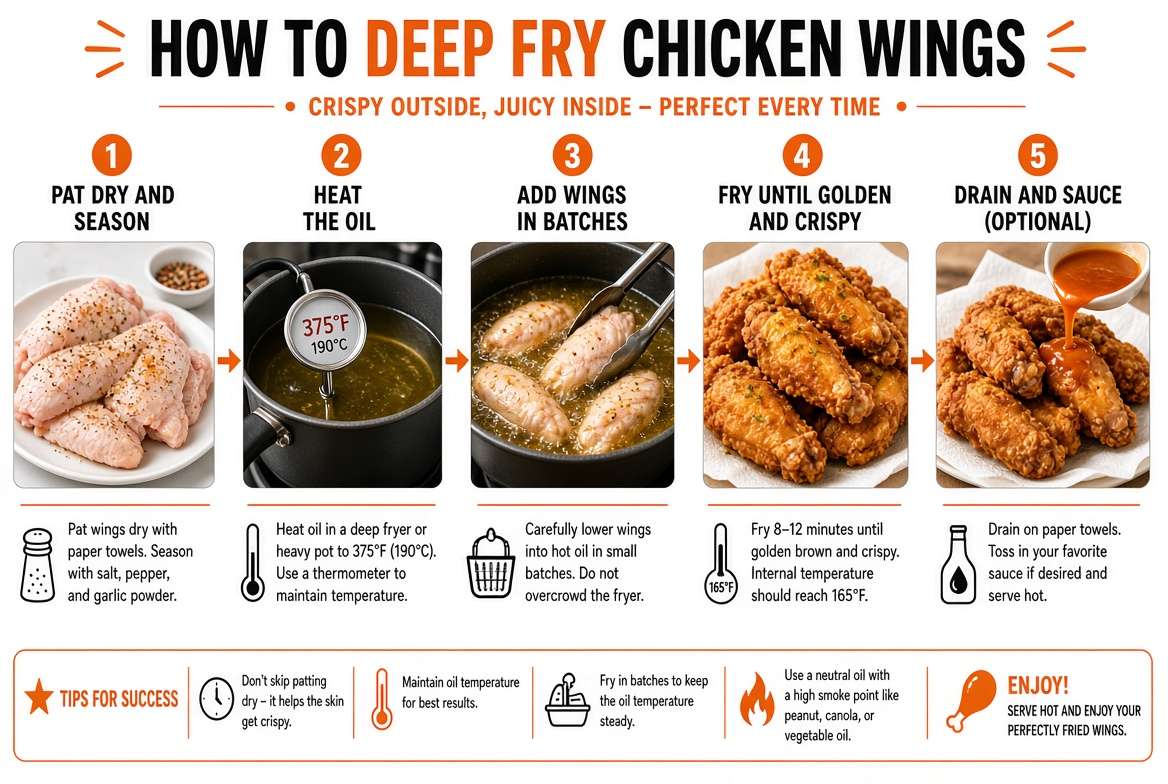
How to Deep Fry Chicken Wings at Home
Crispy, golden chicken wings with juicy meat inside are one of the best snacks you can make. Many people think frying wings is hard, but it really is not. You need a few basic tools, a little patience, and a clear plan. This guide walks you through every step, from picking the right ingredients to serving hot wings that taste like they came from a restaurant.
If you have never deep fried anything before, don’t worry. We will go slowly and explain why each step matters. By the end, you will know how to fry wings safely and get that crunchy outside every time.
In this article
What You Need Before You Start
Gather your supplies first. Frying goes fast once the oil is hot, so it helps to have everything within reach.
You will need chicken wings, about two to three pounds for four people. Look for fresh wings with clean skin and no strange smell. You can buy whole wings and cut them into three pieces, or you can buy pre-cut flats and drumettes to save time.
For the oil, pick one with a high smoke point. Peanut oil is the classic choice because it handles high heat well and adds a mild flavor. Vegetable oil, canola oil, and sunflower oil also work great. You will need enough oil to cover the wings completely, usually about three to four quarts in a deep pot.
Next, grab a heavy pot, ideally a Dutch oven or a deep fryer if you own one. Use a pot that is at least twice as deep as the oil level, so the bubbling oil does not spill over. You will also need a frying thermometer, a slotted spoon or spider strainer, a wire rack, paper towels, and a large bowl.
For seasoning, you need kosher salt, black pepper, garlic powder, paprika, and baking powder. The baking powder is a secret weapon. It helps the skin turn extra crispy and bubbly. Cornstarch works too, so use it if you have it.
Prep the Wings the Right Way
Start by rinsing the wings under cold water, then pat them very dry with paper towels. Dry wings are the key to crispy skin. Water on the surface turns to steam in hot oil, and steam makes the skin soft instead of crunchy. Take your time here and press the towel against each piece.
If you bought whole wings, cut off the wing tips and save them for stock. Then cut the wing at the joint to separate the flat from the drumette. Hold the wing by the thicker end, bend the joint, and slice through the skin with a sharp knife. This step gives you even pieces that cook at the same speed.
Once the wings are dry and cut, place them on a tray and let them sit uncovered in the refrigerator for at least thirty minutes. This quick rest dries the skin even more. Some cooks leave them overnight, and that works well too. Just keep them covered loosely so they stay fresh.
Season the Wings
Seasoning goes on before frying, and you have two good options. You can season right before the wings hit the oil, or you can dry brine them ahead of time for deeper flavor.
For a simple dry rub, mix one tablespoon of kosher salt, one teaspoon of black pepper, one teaspoon of garlic powder, one teaspoon of paprika, and one teaspoon of baking powder. Toss the wings in a large bowl with the rub until every piece is coated. Make sure you use baking powder, not baking soda. Baking soda can taste bitter in large amounts, while baking powder stays neutral.
If you want extra crunch, add two tablespoons of cornstarch to the mix. The starch creates a thin, crisp layer that stays crunchy even after the wings cool down a little. Shake the bowl gently so the coating sticks evenly.
Let the seasoned wings rest for about ten minutes before frying. The salt pulls some moisture to the surface, and the coating turns slightly tacky. That tacky surface grabs onto the seasoning and gives you a better crust.
Heat the Oil to the Right Temperature
Temperature control makes or breaks your fried wings. If the oil is too cool, the wings soak up grease and turn heavy and soggy. If the oil is too hot, the outside burns before the inside cooks through.
Pour your oil into the pot and attach your thermometer to the side, making sure the tip sits in the oil but does not touch the bottom of the pot. Heat the oil over medium-high heat until it reaches 375°F, which is about 190°C. Keep an eye on the thermometer, because oil temperature can climb quickly once it gets close to the target.
Keep a lid nearby in case the oil catches fire. Never pour water into hot oil, and never leave the pot unattended while it heats. Safety comes first with deep frying, so stay near the stove the whole time.
Fry the Wings in Batches
Now comes the fun part. Carefully lower the wings into the oil using a slotted spoon or a spider strainer. Place them in gently, one at a time, away from your body to avoid splatters. The oil will bubble and hiss loudly, which is normal.
Do not overcrowd the pot. Adding too many wings at once drops the oil temperature fast and leads to greasy results. Fry only about six to eight wings at a time, depending on the size of your pot. Give each batch plenty of room to swim around.
Fry the wings for about eight to ten minutes. You will see the skin turn golden brown and the bubbles around each wing will get smaller. Turn the wings occasionally with your spoon so they cook evenly on all sides.
When the first batch is done, lift the wings out and let the excess oil drip back into the pot for a few seconds. Then move them to a wire rack set over a baking sheet. Do not stack them on paper towels, because the bottoms will stay steamy and soft. The wire rack lets air flow around each piece and keeps the crust crisp.
Before you fry the next batch, check that the oil temperature has returned to around 375°F. Give it a minute or two to recover. This small pause keeps every batch consistent.
Try the Double Fry Method
If you want the crispiest wings possible, try a double fry. This method takes a little more time, but the results are excellent. Restaurants use it often, and it works well at home too.
For the first fry, cook the wings at a lower temperature, around 325°F, for about six to seven minutes. The wings will cook through but stay pale. Remove them and let them rest on the wire rack for at least ten minutes.
For the second fry, heat the oil back up to 375°F. Drop the wings in again for two to three minutes, until the skin turns deep golden and crackly. This second round drives out extra moisture and creates a shell that stays crunchy even after sauce goes on.
The double fry is not required for good wings, but it does make a noticeable difference. If you are short on time, a single fry at 375°F still gives you tasty results.
Check That the Wings Are Fully Cooked
Safety matters with chicken, so always confirm the wings reached the right temperature. Insert an instant-read thermometer into the thickest part of the meat, avoiding the bone. The internal temperature should reach 165°F, which is about 74°C.
If you do not have a thermometer, cut into the thickest piece near the bone. The meat should look white and opaque, and the juices should run clear. If you see pink meat near the bone, fry the wings for another minute or two and check again.
Most wings take about ten minutes total, but size and batch size can change the timing. Trust the thermometer over the clock whenever you can.
Toss the Wings in Sauce
Once the wings are crispy and fully cooked, it is time for sauce. Work quickly, because the wings stay hot and crunchy only for a short while.
Buffalo sauce is the most popular choice. Mix about half a cup of hot sauce with four tablespoons of melted butter and a teaspoon of garlic powder. Pour the mixture over the wings in a large bowl and toss gently until each piece is coated. You can also add a pinch of brown sugar if you like a sweeter flavor.
For a sticky option, try honey garlic sauce. Heat half a cup of honey, three tablespoons of soy sauce, two cloves of minced garlic, and a splash of rice vinegar in a small pan for about two minutes. Toss the hot wings in the sauce right away so it clings well.
For a dry rub finish, skip the sauce and sprinkle your favorite spice blend over the wings while they are still hot. Lemon pepper, Cajun seasoning, and barbecue rub all taste great this way. Shake the bowl so the seasoning sticks to every piece.
If you want to keep the skin crispy, serve sauce on the side for dipping. This is a smart choice for guests who like their wings less saucy. Ranch, blue cheese dressing, and honey mustard are classic dips that pair well with fried wings.
Common Mistakes to Avoid
Even simple recipes have a few traps, so keep these tips in mind.
Wet wings are the biggest problem. Always dry them well before seasoning and frying. Water splatters in hot oil and can cause dangerous popping.
Crowding the pot is another common mistake. Too many wings lower the oil temperature and leave you with greasy, soft skin. Fry in small batches and let the oil recover between rounds.
Skipping the rest on the wire rack ruins the crunch. Paper towels trap steam and make the bottoms soggy. A wire rack keeps air moving under the wings.
Sauce too early also causes problems. If you coat the wings before they cool slightly, the sauce can make the skin lose its crunch fast. Toss them right before serving.
Finally, do not rush the oil. Cold oil leads to heavy wings, and oil that is too hot leads to burnt outsides with raw centers. Use a thermometer and keep the temperature steady.
How to Store and Reheat Leftover Wings
Fried wings taste best fresh, but leftovers are still good if you store them properly. Let the wings cool completely, then place them in an airtight container. Keep them in the refrigerator for up to three days.
To reheat, skip the microwave, because it makes the skin rubbery. Instead, heat the oven to 400°F, which is about 200°C. Place the wings on a wire rack set over a baking sheet and bake for about eight to ten minutes. The skin will crisp up again, and the meat will heat through evenly.
An air fryer also works well for reheating. Set it to 380°F for about five minutes, flipping the wings halfway through. Either method brings back much of the original crunch.
Frequently Asked Questions
Can I fry wings without a deep fryer?
Yes. A heavy pot with deep sides works just fine. A Dutch oven is a great choice because it holds heat well. Just make sure the pot has enough room for the oil and wings without overflowing.
Can I reuse the frying oil?
You can reuse the oil once or twice if you strain it through a fine mesh strainer or cheesecloth after it cools. Store it in a sealed container in a cool, dark place. If the oil smells off, looks dark, or foams heavily, throw it away.
Why are my wings not crispy?
The most common causes are wet skin, low oil temperature, and too many wings in the pot. Dry the wings well, keep the oil near 375°F, and fry in small batches.
Can I make wings ahead for a party?
You can fry the wings early and keep them warm in a low oven around 200°F. Place them on a wire rack so they stay crisp. Add the sauce just before serving.
What is the best oil for frying wings?
Peanut oil is the top pick because of its high smoke point and clean taste. Canola oil and vegetable oil are affordable and work well too.
Final Thoughts
Deep frying chicken wings is easier than most people expect. Start with dry wings, season them well, keep the oil at the right temperature, and fry in small batches. Use a thermometer to check the heat and the doneness, and do not skip the wire rack. With these simple steps, you can make crispy, juicy wings that taste great with any sauce you love.
Try this recipe the next time you want a fun snack or a game day treat. Once you get the hang of it, you can experiment with new seasonings, sauces, and dips. Your friends and family will be happy to taste the results, and you will feel proud of your crispy homemade wings.

Mary is a home cooking enthusiast and kitchen appliance reviewer who loves helping people find the best tools for everyday meals. She enjoys testing air fryers, deep fryers, and other cooking appliances while sharing honest reviews and practical buying advice. Through FryerPick.com, Mary provides expert guides, product comparisons, and cooking tips to help readers choose the right fryer for their kitchen.