How to Remove Air Fryer Odors?
If you love your air fryer, you already know it can turn out crispy fries, juicy chicken wings, and golden veggies in no time. But there’s one thing that catches almost every air fryer owner off guard: the smell. That lingering odor that hangs around long after you’ve finished cooking. Maybe it smells like fish from last night’s dinner, or burnt oil from a batch of fries that stayed in too long. Either way, that smell can sneak into your kitchen and even into your next meal.
The good news? You don’t need fancy products or hours of scrubbing to fix this. With a few easy steps and things you probably already have at home, you can get rid of air fryer odors for good and keep your machine smelling fresh every time you use it.
This guide walks you through why air fryers start to smell, how to deep clean them properly, and simple habits that stop odors before they even start.
In this article
Why Does Your Air Fryer Smell in the First Place?
Before jumping into cleaning tips, it helps to know why the smell happens. Air fryers work by circulating hot air around food at high speed. This is great for crispy texture, but it also means oil, grease, and tiny food particles get blasted around inside the machine. Over time, these bits stick to the basket, the heating element, and even the walls of the fryer.
Here are the most common reasons your air fryer starts to stink:
- Grease buildup: Oil splatters and settles into small cracks and corners that are easy to miss during a quick wash.
- Burnt food bits: Small crumbs or leftover bits burn each time you turn the fryer on, creating a smoky or bitter smell.
- Strong-smelling foods: Fish, garlic, and heavily spiced meals leave behind odors that soak into the basket and tray.
- Moisture trapped inside: A damp air fryer that isn’t dried well can start to smell musty, almost like mildew.
- Old or expired oil residue: Reused oil breaks down and creates a stale, almost rancid smell.
Once you know the cause, cleaning becomes a lot easier because you know exactly where to focus your effort.
Step 1: Unplug and Cool Down First
This step sounds obvious, but it’s easy to forget when you’re eager to clean right after cooking. Always unplug your air fryer and let it cool completely before touching any part of it. Cleaning a hot appliance is not just risky for your skin, it can also damage the nonstick coating on the basket.
Give it at least twenty to thirty minutes to cool down fully. This also helps loosen grease a little, making it easier to wipe away later.
Step 2: Take Apart Every Removable Piece
Most air fryers come with a basket, a tray, and sometimes a small crumb tray at the bottom. Pull out every piece you can. Odors love to hide in gaps and corners, so the more you separate the parts, the better your cleaning results will be.
If you’re not sure which parts come apart, check your fryer’s manual. Some models have hidden trays or extra grates that are easy to miss.
Step 3: Wash With Warm Soapy Water
Fill your sink with warm water and a few drops of dish soap. Submerge the basket and tray for about ten minutes. This soak time helps loosen grease and burnt bits so you don’t have to scrub too hard.
After soaking, use a soft sponge to clean each part. Avoid steel wool or anything too rough since it can scratch the nonstick surface. Rinse well and check every corner for leftover grease. Grease left behind is one of the biggest reasons smells keep coming back.
Dry the parts completely with a clean towel, then let them air dry for a bit longer before putting them back. Moisture left inside is a common cause of musty smells, so this step really matters.
Step 4: Clean the Inside of the Machine
The basket and tray are easy to clean since you can dunk them in water, but the main unit needs a different approach. Never submerge the base of your air fryer in water, since it has electrical parts inside.
Instead, follow these steps:
- Wipe the interior with a damp cloth mixed with a little dish soap.
- Focus on the heating element at the top, since grease often splatters there.
- Use a soft brush, like an old toothbrush, to reach tight corners and grooves.
- Wipe again with a clean, damp cloth to remove soap residue.
- Dry the inside with a dry towel and leave the fryer open for an hour so it airs out completely.
This step alone removes a huge chunk of trapped odor since the heating element is often the main source of that burnt smell.
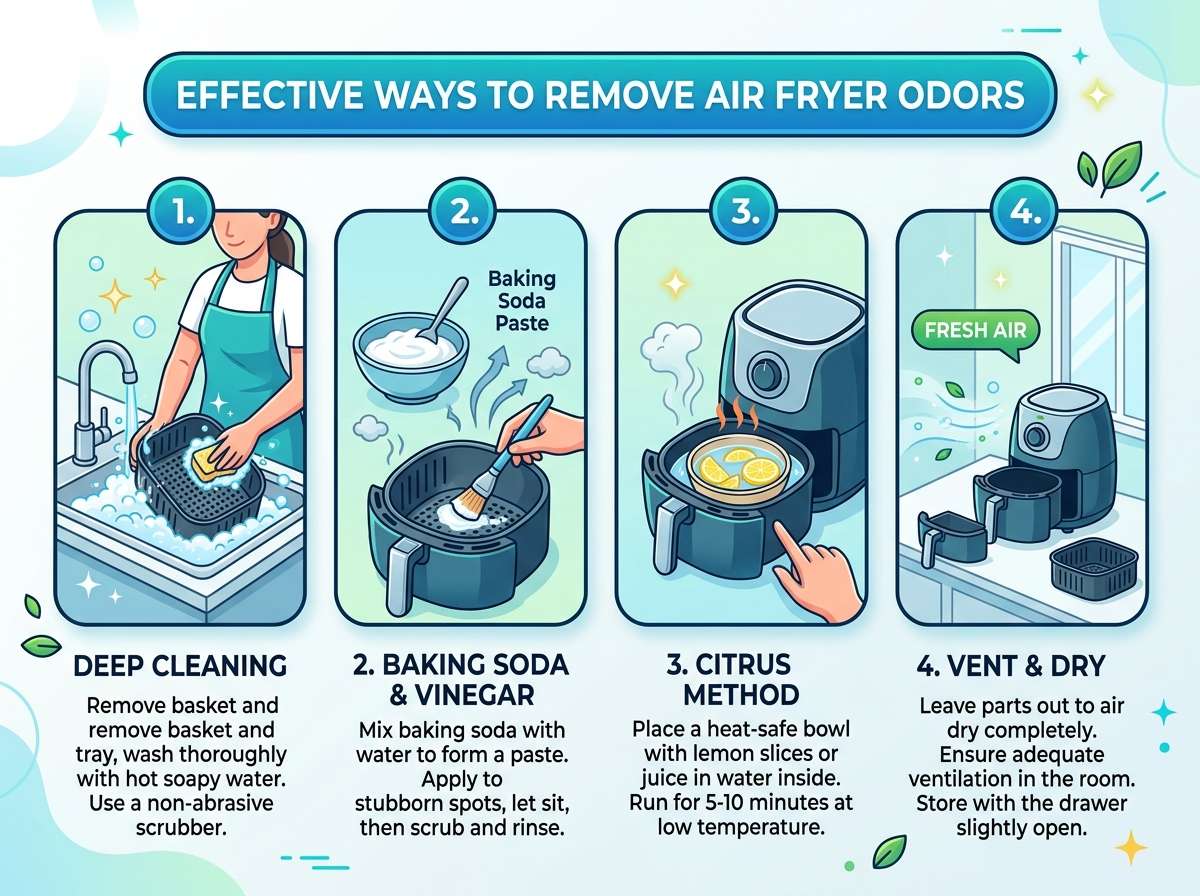
Step 5: Use Baking Soda for Stubborn Smells
If regular washing didn’t fully get rid of the smell, baking soda works like magic. It’s gentle, natural, and great at pulling out odors trapped in tiny crevices.
Here’s how to use it:
- Sprinkle a generous amount of baking soda inside the basket and tray.
- Add a few drops of water to make a light paste.
- Let it sit for about fifteen to twenty minutes.
- Scrub gently with a soft brush or sponge.
- Rinse thoroughly and dry well.
Baking soda works because it neutralizes odor molecules instead of just masking them with a stronger smell. This makes it one of the best natural deodorizers for kitchen appliances.
Step 6: Try a Vinegar and Water Rinse
Vinegar is another kitchen hero when it comes to removing smells. Its acidity breaks down grease and kills lingering odor-causing bacteria.
Mix equal parts white vinegar and water in a bowl. Dip a cloth into the mixture and wipe down the basket, tray, and interior walls. Let it sit for a few minutes before rinsing with clean water. The vinegar smell fades quickly and takes the odor with it.
If the smell is really strong, you can even run the fryer empty at a low temperature for about five minutes with a small bowl of vinegar and water placed inside the basket. Just be sure to check your manufacturer’s guidelines first, since not every model is designed for this trick.
Step 7: Use Lemon for a Fresh Finish
Lemon adds a natural, fresh scent while also helping cut through grease. After your basket and tray are clean, rub a few lemon slices along the surfaces. Let the juice sit for a few minutes, then rinse and dry.
Some people even like to place lemon peels inside the fryer and run it empty at a low temperature for a couple of minutes. The heat releases citrus oils that leave a light, pleasant scent behind. Just watch closely so nothing burns.
Step 8: Deep Clean the Crumb Tray Regularly
The crumb tray at the bottom of many air fryers collects small bits of food that fall through the basket. If ignored, these bits burn every time you cook, creating that stubborn smoky smell.
Make it a habit to check and clean this tray after every few uses. A quick wash with warm soapy water is usually enough to keep it fresh.
Step 9: Air Out the Machine After Cleaning
Once everything is clean, leave the air fryer open for at least an hour before storing it. This helps release trapped moisture and lets fresh air replace old smells. Storing a damp fryer is one of the top reasons odors return even after a good cleaning.
If you live somewhere humid, consider placing your fryer near an open window or a fan for faster drying.
Simple Habits to Stop Odors Before They Start
Cleaning after a smell shows up works, but stopping it early saves you time and effort. These easy habits can make a big difference in keeping your air fryer smelling clean all the time.
Wipe It Down After Every Use
You don’t need a full deep clean every time. A quick wipe with a damp cloth right after cooking removes grease before it has a chance to settle in.
Avoid Overfilling the Basket
Packing too much food into the basket causes more oil splatter and uneven cooking, both of which lead to burnt bits and stronger smells. Cook in smaller batches for better results and less mess.
Use Parchment Liners or Light Oil Sprays
Parchment paper made for air fryers can catch grease before it touches the basket. Light oil sprays instead of pouring oil directly also help reduce buildup over time.
Clean Right After Strong-Smelling Meals
Fish, garlic, and heavily spiced dishes leave odors behind fast. Clean your fryer as soon as possible after cooking these foods so the smell doesn’t have time to soak in.
Dry Fully Before Storing
Always make sure your air fryer is completely dry before putting it away. Trapped moisture is one of the easiest ways to invite musty smells.
Deep Clean on a Schedule
Even with regular wiping, plan a deeper clean every week or two depending on how often you use your fryer. This keeps grease from building up in hidden spots you might miss during quick cleanups.
What to Avoid When Cleaning Your Air Fryer
A few common mistakes can make odor problems worse instead of better. Keep these in mind:
- Never submerge the main unit in water. This can damage the electrical parts inside.
- Avoid harsh chemical cleaners. Strong chemicals can leave their own smell behind and may damage nonstick coatings.
- Don’t use metal scrubbers. These scratch surfaces, creating more grooves where grease and smells can hide.
- Don’t skip drying time. Moisture left behind leads to musty smells that are hard to remove later.
- Don’t ignore small parts like rubber seals or vents. These often trap grease and need gentle cleaning too.
When to Deep Clean More Often
If you use your air fryer daily, plan for weekly deep cleans instead of monthly ones. Cooking oily foods like wings, bacon, or breaded items causes faster grease buildup, so these need more frequent attention. Light users cooking mostly vegetables or lean proteins can usually get away with cleaning every couple of weeks.
Pay attention to warning signs like smoke while cooking, a burnt smell even with fresh food, or visible grease buildup on the basket. These are clear signals it’s time for a deeper clean.
A Quick Recap Checklist
To keep things simple, here’s a fast checklist you can follow each time your air fryer starts to smell:
- Unplug and let it cool completely.
- Remove all detachable parts.
- Soak in warm soapy water for ten minutes.
- Scrub gently with a soft sponge or brush.
- Wipe down the interior and heating element carefully.
- Use baking soda paste for tough spots.
- Rinse with a vinegar and water mix for extra freshness.
- Add a lemon rub or citrus rinse for a light scent.
- Dry everything fully before reassembling.
- Leave the fryer open to air out for at least an hour.
Following this checklist regularly keeps your air fryer smelling fresh and your food tasting the way it should, without any leftover odors from previous meals.
Final Thoughts
Getting rid of air fryer odors doesn’t have to be complicated. Most of the smell comes down to grease, burnt bits, and trapped moisture, all of which are easy to fix with basic household items like baking soda, vinegar, and lemon. Cleaning your fryer regularly, drying it fully, and airing it out after each wash keeps bad smells from building up in the first place.
Small habits, like wiping the basket after each use and cleaning the crumb tray often, go a long way toward keeping your kitchen appliance smelling fresh. With these simple steps, your air fryer can stay clean, odor-free, and ready to cook delicious meals every single time.

Mary is a home cooking enthusiast and kitchen appliance reviewer who loves helping people find the best tools for everyday meals. She enjoys testing air fryers, deep fryers, and other cooking appliances while sharing honest reviews and practical buying advice. Through FryerPick.com, Mary provides expert guides, product comparisons, and cooking tips to help readers choose the right fryer for their kitchen.