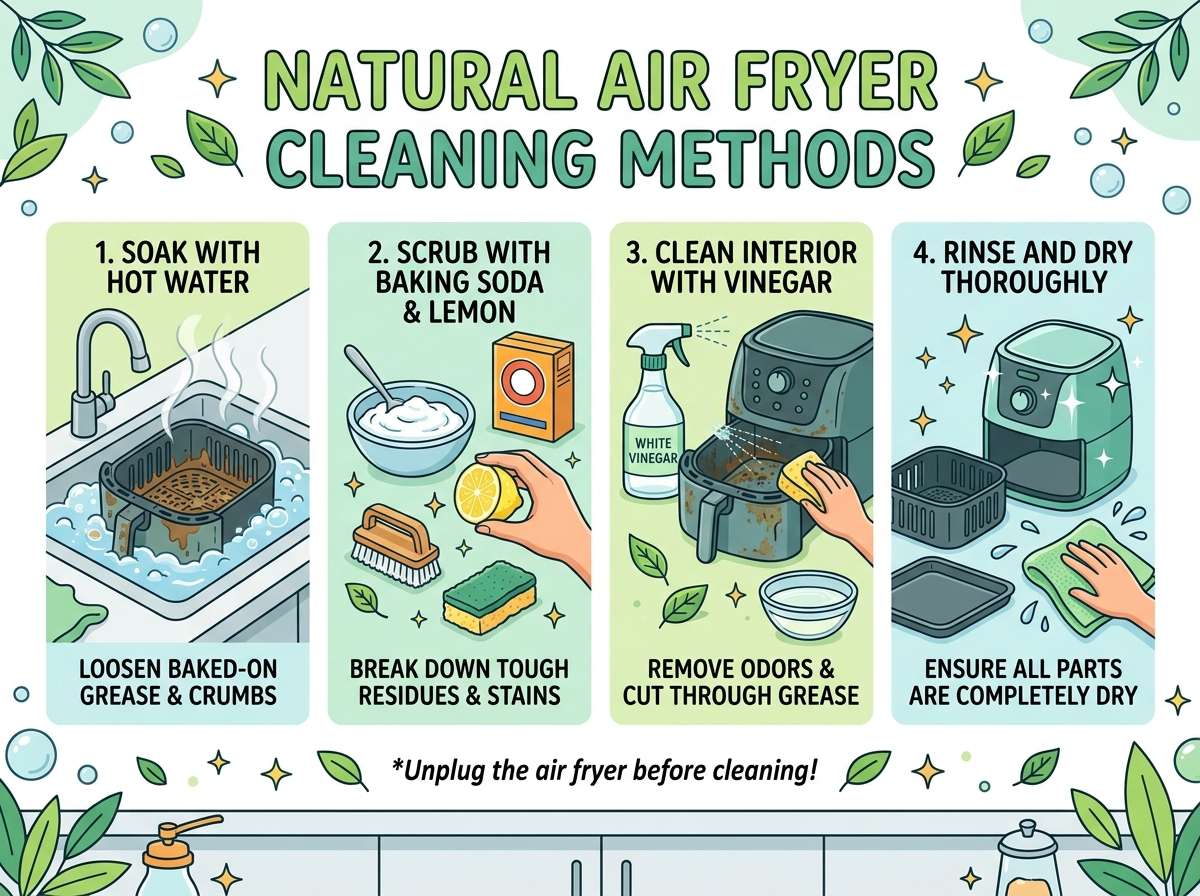
Natural Air Fryer Cleaning Methods
Air fryers have become a kitchen staple for so many people. They cook food faster than traditional ovens, make everything crispy and delicious, and honestly make cooking less stressful. But keeping your air fryer clean? That’s where things get tricky. You don’t want to use toxic chemicals near food, yet stubborn grease and buildup can be tough to remove.
The good news is that you can clean your air fryer effectively using simple, natural ingredients you already have at home. Let me show you how to keep your air fryer sparkling clean without spending money on expensive commercial cleaners or exposing your family to harsh chemicals.
In this article
Why Natural Cleaning Solutions Work Best for Air Fryers
When you think about what your air fryer does, it makes sense to clean it naturally. You’re cooking food that you’ll eat in this machine. Do you really want strong chemical residue sitting inside? I don’t think so.
Natural cleaning methods are gentler on your appliance, safer for your family, and better for the environment. They’re also way cheaper than store-bought cleaners. Best of all, they work just as well as anything you could buy. Many people discover that natural solutions actually work better because they can target specific types of buildup without damaging the non-stick coating.
Your air fryer basket has a special non-stick surface that makes cooking easy and cleanup faster. Harsh chemicals can wear away this coating over time. Natural cleaners are gentle enough to protect that surface while still getting everything spotless.
Gather Your Natural Cleaning Supplies
Before you start cleaning, let’s round up the items you’ll need. The beautiful part is that you probably already have all of these at home:
The cleaning crew:
- White vinegar (the regular kind from your pantry)
- Baking soda (that box you use for baking)
- Lemon juice (fresh or bottled)
- Dish soap (the liquid kind you use for washing dishes)
- Water (tap water works perfectly fine)
The tools:
- Soft sponges or cloths
- An old toothbrush (soft bristles work best)
- Paper towels
- A spray bottle
- Soft scrub brushes
That’s it. No fancy equipment needed. No expensive products to buy. Just basic items that do an amazing job at cutting through grease, dissolving gunk, and making your air fryer look brand new.
Daily Quick Cleaning: Your Secret to Less Work Later
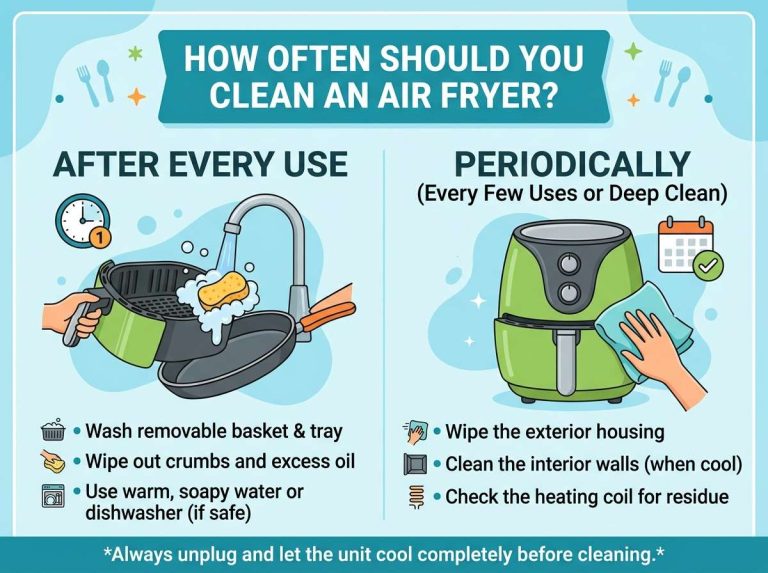
The easiest way to keep your air fryer clean is to prevent heavy buildup from happening in the first place. This means doing a quick cleanup after every use.
Let your air fryer cool down completely after cooking. Don’t rush this step—waiting a few minutes keeps you safe from burns and lets the grease cool enough to wipe away easily.
Once it’s cool, pull out the basket and tray. Use a dry paper towel or cloth to wipe away loose crumbs and excess oil. Most of the time, this simple action is all you need. The debris comes right off without any scrubbing at all.
For the outside of your air fryer, use a damp cloth to wipe away any grease splatters or dust. Keep the outside clean and it actually motivates you to keep using your air fryer regularly because it looks nice.
This daily routine takes maybe two minutes. Seriously. That two-minute investment saves you from hours of scrubbing later. Your future self will thank you for starting this habit.
Baking Soda: The Natural Wonder Cleaner
Baking soda is honestly a miracle worker when it comes to cleaning air fryers. This powder tackles stuck-on gunk, cuts through grease, and leaves everything sparkling. Best of all, it costs practically nothing.
Cleaning the basket and tray with baking soda:
Start by running warm water into your sink or a large bowl. Sprinkle baking soda into the water until you get a thick, paste-like consistency. This mixture becomes your cleaning solution.
Soak your air fryer basket and tray in this baking soda water for about fifteen to twenty minutes. The baking soda goes to work on all the baked-on food and grease right away. You’ll see it start to loosen up without you even lifting a finger.
After soaking, grab a soft brush or that old toothbrush. Scrub the basket and tray gently but with purpose. Pay special attention to corners, crevices, and tight spots where oil loves to hide and accumulate. The gunk comes away so easily because the baking soda already did most of the work.
Rinse everything thoroughly with clean water. Make sure all the baking soda residue washes away. Dry the basket and tray completely with a cloth before putting them back into your air fryer.
Deep cleaning the inside chamber:
The inside of your air fryer gets grimy from cooking oily foods. This is normal, and it’s totally fixable.
Mix baking soda with just enough water to make a thick paste. You want it thick enough to stick to surfaces but spreadable enough to apply easily. Use your toothbrush to apply this paste to the heating element area and the inner walls of the chamber.
Let this paste sit for five to ten minutes. This waiting time allows the baking soda to break down grease and loosen buildup. Then grab a damp cloth and wipe everything away. You might need to go over some spots a few times, and that’s perfectly fine. Take your time and be thorough.
For any remaining residue, spray water inside the chamber and wipe again until you see nothing but clean surfaces.
White Vinegar: The Grease-Cutting Powerhouse
White vinegar is like liquid gold in the cleaning world. It cuts through grease, eliminates odors, and dissolves mineral deposits. For air fryer cleaning, it’s an absolute game changer.
Using vinegar for the basket:
Mix equal parts white vinegar and warm water in a bowl. This simple solution is your grease fighter. Soak your basket and tray in this mixture for about twenty minutes. The vinegar starts breaking down grease right away, making your job much easier.
After soaking, wipe everything with a cloth or soft sponge. You’ll be amazed at how easily the grease comes off. For stubborn spots that didn’t come clean, spray the vinegar solution directly on them, wait a minute, and wipe again. Most stubborn spots disappear with this technique.
Vinegar for the air fryer interior:
Pour the vinegar and water solution into a spray bottle. Spray this mixture inside the cooking chamber, paying attention to greasy areas and the sides where oil tends to splatter and stick.
Let it sit for a few minutes without wiping. The vinegar needs time to work on the grease. Then use a damp cloth to wipe out the chamber completely. For tight spaces and corners, your soft toothbrush works perfectly.
After wiping with the vinegar solution, spray plain water inside the chamber and wipe again to remove any vinegar residue. The smell of vinegar fades completely once everything dries, so don’t worry about your kitchen smelling pickled.
Combining Vinegar and Baking Soda: The Ultimate Cleaning Combo
Sometimes you face really tough, baked-on messes. That’s when you combine vinegar and baking soda to create a powerful cleaning reaction.
Here’s how the magic works: Sprinkle baking soda on the dirty area, then spray vinegar on top. Watch it fizz and bubble. This fizzing action is the real cleaning power. It lifts grime, breaks down grease, and makes stubborn spots surrender.
Let this mixture fizz for ten to fifteen minutes. The fizzing does the heavy lifting for you, so you don’t have to scrub as hard. Then grab your cloth or brush and wipe everything away.
This combo is especially amazing for the basket, tray, and any stubborn spots inside the chamber. You’ll watch years of buildup disappear. It’s basically a homemade all-purpose air fryer cleaner that costs just pennies to make.
Lemon: Fresh, Natural, and Effective
Lemon is another natural powerhouse that people often overlook. It cuts through grease, smells fantastic, and is gentle enough to use on delicate surfaces.
Cut a lemon in half and use it like a sponge. Rub the cut side directly on greasy areas of your basket or tray. The natural acid in lemon juice works to break down oily buildup while leaving behind a fresh, clean scent. Your kitchen actually smells better when you use lemon.
For the inside of your air fryer, squeeze fresh lemon juice into water and create a cleaning solution similar to the vinegar method. Spray it around, let it sit for a minute, and wipe clean.
You can also mix lemon juice with baking soda to create a gentle paste. This combination works wonders on stubborn spots. Just mix them together until you get a spreadable consistency, apply it to the dirty area, wait a few minutes, and wipe away.
Lemon leaves your air fryer smelling fresh and clean naturally, without any fake scents or chemical odors.
Dish Soap and Warm Water: The Simple Solution
Sometimes the simplest solution is the best. Plain dish soap and warm water handle light to moderate cleaning beautifully and work fast.
Fill your sink or a bowl with warm water and add just a few drops of dish soap. Soak your basket and tray for ten to fifteen minutes. The soap helps lift grease off the surfaces gently but effectively.
Use a soft sponge or cloth to wipe everything clean. The grease comes away easily because the soap breaks it down. Rinse thoroughly with plain water and dry completely.
This method works great for regular maintenance between deep cleaning sessions. It’s gentle, effective, and something you already have under your kitchen sink.
Tackling the Heating Element: Care and Caution
The heating element is crucial to keep clean because buildup there affects how well your air fryer cooks. It’s also the most delicate part to clean because you have to be careful not to damage it.
Never soak the heating element in water. Just don’t do it. Electrical components and water don’t mix safely. Instead, use a damp cloth to gently wipe it. If there’s stubborn buildup, make a baking soda paste and apply it carefully with a soft brush. Let it sit briefly, then wipe with a damp cloth.
Some people use a soft brush to gently brush away loose debris from the heating element. This is fine as long as you’re gentle and careful not to bend or damage anything.
If you feel nervous about cleaning the heating element, that’s okay. Just focus on the basket, tray, and chamber. Your air fryer will still work great with those parts clean.
Keeping the Glass Window Crystal Clear
Many air fryers have a window so you can watch your food cook. Keeping it clear makes cooking more enjoyable and helps you check on your food.
Make a paste of baking soda and water. Apply it to the window and let it sit for five minutes. Use a soft cloth to wipe it away gently. This removes grease splatters and keeps the glass clear and streak-free.
For stubborn spots on the window, spray the vinegar and water solution on it, let it sit for a minute, and wipe gently. The window should come clean easily.
Never use harsh abrasive materials that could scratch the glass. Always go gentle with glass surfaces to avoid damage.
Cleaning the Drip Tray: Don’t Forget This Important Part
The tray that sits under the basket collects all the oil and drippings from your food. It gets dirty fast, but it’s super easy to clean.
Spray it with the vinegar and water solution or soak it in warm soapy water. The grease comes right off without scrubbing. For stubborn spots, the baking soda and vinegar combo works perfectly.
Make sure to dry the tray completely before putting it back in your air fryer. Water sitting there can eventually cause rust or other issues, so always dry thoroughly.
How Often Should You Deep Clean Your Air Fryer?
This depends on how much you use your air fryer. Here’s a practical guide:
If you use your air fryer several times a week, deep clean every two weeks. Just pick your favorite method and give everything a proper scrub. Your air fryer stays in top condition with this schedule.
If you use it once a week or less, deep cleaning once a month is plenty. Between deep cleans, stick with your daily two-minute wipe-down and you’re golden.
If you use your air fryer almost every day, consider deep cleaning weekly. Your air fryer will thank you with better performance and a longer lifespan.
Making Your Own Reusable Cleaning Spray
Want to make a cleaning spray that you can keep handy? It’s super easy and saves money.
Mix one part white vinegar with one part water in a spray bottle. Add three to five drops of lemon essential oil if you want it to smell better (lemon oil is amazing for this). Shake it up before each use.
Keep this spray near your air fryer. After cooking, spray the basket, tray, and chamber, let it sit for a minute, and wipe clean. This gives you a quick, natural cleaning solution without buying anything expensive.
You can make a big batch and refill your spray bottle whenever you need it.
Tips for Keeping Your Air Fryer Cleaner Longer
Prevention is way easier than heavy cleaning. Here are some tricks to keep your air fryer in great shape and reduce cleaning time:
Use parchment paper: Lining your basket with parchment paper catches drippings and crumbs. This means less cleanup for you. You can buy air fryer parchment paper at most stores, or use regular parchment paper if you poke a few holes in it so air can flow properly.
Don’t overfill the basket: Crowding food into the basket causes grease splatters and uneven cooking. Give your food room to breathe. This means fewer messes and a cleaner air fryer.
Pat dry your food: Wetter food creates more splatter and grease buildup. Pat your food dry before cooking, and you’ll have less cleanup afterward. This simple step makes a big difference.
Clean the basket right away: Don’t let grease sit on the basket for hours. Clean it while it’s still warm (but cool enough to touch). The grease comes off way easier when it’s warm than when it hardens.
Let it cool completely: Before you start cleaning, make sure your air fryer has cooled down completely. This is safer for you and helps you see exactly what needs cleaning without burning yourself.
Common Cleaning Mistakes to Avoid
Let’s talk about what not to do. These mistakes can damage your air fryer or make cleaning harder:
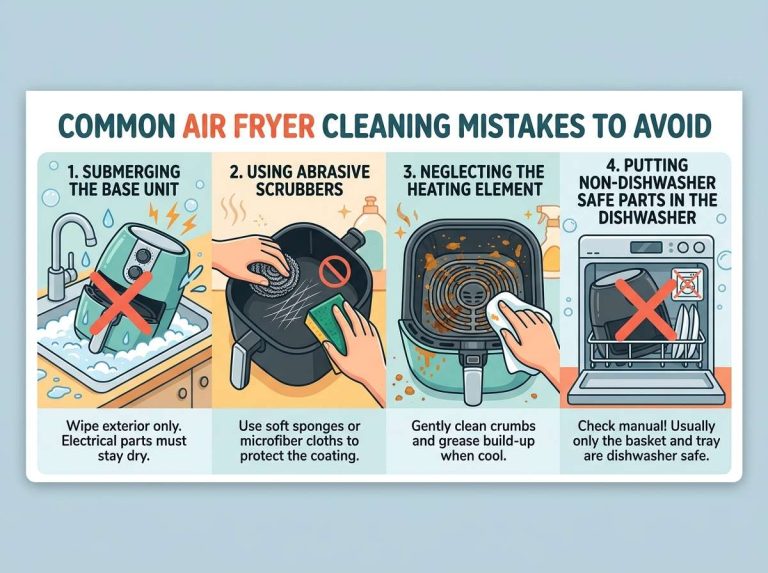
Don’t use harsh chemical cleaners. They’re not necessary, and they might damage the non-stick coating on your basket and interior surfaces.
Don’t use abrasive scrubbers or steel wool. These materials scratch the basket and damage the non-stick surface. Stick with soft brushes and cloths.
Don’t soak the heating element or any electrical parts. Water and electricity create dangerous situations, so be careful and cautious.
Don’t use the dishwasher for parts that aren’t dishwasher safe. Check your manual first. Most air fryer baskets shouldn’t go in the dishwasher because it damages the non-stick coating.
Don’t scrub the window aggressively. Gentle cleaning keeps it clear and prevents damage or cracks.
Don’t use water hotter than you can comfortably touch. Boiling water can damage some air fryer components, so stick with warm water.
Storing Your Air Fryer Properly
Clean air fryer storage helps your machine stay in good shape for years. Make sure everything is completely dry before you put it away or use it again.
Store your air fryer in a cool, dry place away from direct heat and moisture. Don’t cover it while it’s still warm because moisture can get trapped inside and cause damage.
If you’re storing it for a long time, make sure it’s totally clean and dry first. Let it air dry completely before putting the cover on.
Troubleshooting Stubborn Stains and Odors
Sometimes your air fryer needs a little extra help. If you notice stubborn stains that won’t come clean, try soaking the basket overnight in a baking soda and water mixture. This extra time lets the baking soda work harder on tough gunk.
For odors, sprinkle baking soda on the tray and basket and let it sit for a few hours or overnight. Baking soda absorbs odors naturally without adding any chemical smell to your air fryer.
If you notice a burning smell coming from your air fryer, it might have food debris stuck to the heating element. Turn it off, let it cool completely, and clean the heating element area very carefully with a damp cloth.
The Bottom Line on Natural Air Fryer Cleaning
Cleaning your air fryer doesn’t have to be complicated or involve harsh chemicals. These natural methods work amazingly well, they’re cheaper than commercial cleaners, and they’re safer for your family and the planet.
You’ve got vinegar, baking soda, lemon, and basic dish soap already in your home. Mix and match these ingredients based on what you’re cleaning and how dirty it is. Do your daily two-minute wipe-down, deep clean regularly with natural solutions, and your air fryer will stay fresh and functional for years to come.
Start with one method that sounds easiest to you, try it out, and stick with what works. You’ll quickly discover your favorite way to clean your air fryer naturally. Before you know it, keeping your air fryer clean will become such a quick and easy habit that you won’t even think about it anymore.
Happy cooking and happy cleaning with your sparkling air fryer!

Mary is a home cooking enthusiast and kitchen appliance reviewer who loves helping people find the best tools for everyday meals. She enjoys testing air fryers, deep fryers, and other cooking appliances while sharing honest reviews and practical buying advice. Through FryerPick.com, Mary provides expert guides, product comparisons, and cooking tips to help readers choose the right fryer for their kitchen.