How to Brine a Turkey for Deep Frying?
Deep frying a turkey gives you crispy skin and fast cooking time, but there’s one problem. The high heat can dry out the meat if you skip a key step. That step is brining. A good brine locks in moisture, adds flavor deep into the meat, and helps you avoid the dry, bland turkey that ruins a holiday meal.
This guide walks you through every part of the process. You’ll learn what brining actually does, the tools you need, the exact steps to follow, and the small mistakes that trip up most beginners. By the end, you’ll know exactly how to brine a turkey for deep frying like someone who’s done it a hundred times.
In this article
What Brining Actually Does to a Turkey
Brining is the process of soaking meat in a saltwater solution before you cook it. The salt breaks down some of the muscle fibers in the turkey, which lets the meat hold onto more water during cooking. That water turns into steam inside the bird as it fries, keeping the meat tender instead of tough.
Salt also acts as a flavor carrier. It doesn’t just sit on the surface, it moves into the meat through a process called osmosis. This means every bite of your turkey tastes seasoned, not just the outer layer.
For deep frying specifically, brining matters even more than it does for roasting. Hot oil cooks fast, sometimes in under an hour for a whole bird. That speed doesn’t give the turkey much time to build up moisture on its own, so the brine does the heavy lifting before the turkey ever touches the fryer.
Wet Brine vs Dry Brine: Which One Works Better for Frying
There are two main ways to brine a turkey: wet and dry. Both work, but they behave differently once you drop the bird into hot oil.
Wet Brine
A wet brine is a mix of water, salt, sugar, and seasonings. You submerge the turkey in this liquid for several hours or overnight. Wet brining adds a lot of moisture to the meat, which is great for flavor and texture.
The downside is water. Any liquid left on the turkey’s skin when it hits the fryer can cause dangerous oil splatter. This is the single biggest safety concern with deep frying a wet-brined bird, so drying the turkey fully before frying isn’t optional, it’s required.
Dry Brine
A dry brine skips the liquid entirely. You rub a mix of salt, sugar, and spices directly onto the turkey’s skin and let it rest, usually uncovered, in the fridge. The salt pulls moisture out of the meat at first, then that moisture (now mixed with salt) gets reabsorbed back into the muscle.
Dry brining is often the safer and easier route for deep frying because there’s no standing water to deal with. The skin also dries out during the resting period, which helps it crisp up nicely in the fryer.
If you’re new to deep frying, dry brining is usually the simpler and lower-risk choice. Wet brining gives a slightly juicier result for some cooks, but it takes more planning around drying time.
What You’ll Need
Before you start, gather these items:
- A whole turkey (thawed completely if it was frozen)
- Kosher salt or coarse sea salt (avoid iodized table salt, it can taste bitter)
- Brown sugar or white sugar
- Aromatics like garlic, bay leaves, peppercorns, and citrus peel
- Fresh herbs such as thyme, rosemary, or sage
- A large food-safe container, cooler, or brining bag big enough to hold the turkey
- A meat thermometer
- Paper towels for drying
- Space in the fridge or a cold cooler with ice packs
If you go with a wet brine, you’ll also need enough water to fully cover the turkey, plus room in your fridge or a cooler that can stay below 40°F the entire time.
Step-by-Step Wet Brine Method
Step 1: Pick the Right Container
Use a container large enough to hold the turkey plus the brine liquid, with room to spare. A clean cooler works great because it holds the cold temperature well and has enough space for a big bird. Line it with a heavy-duty brining bag to keep things clean.
Step 2: Make the Brine
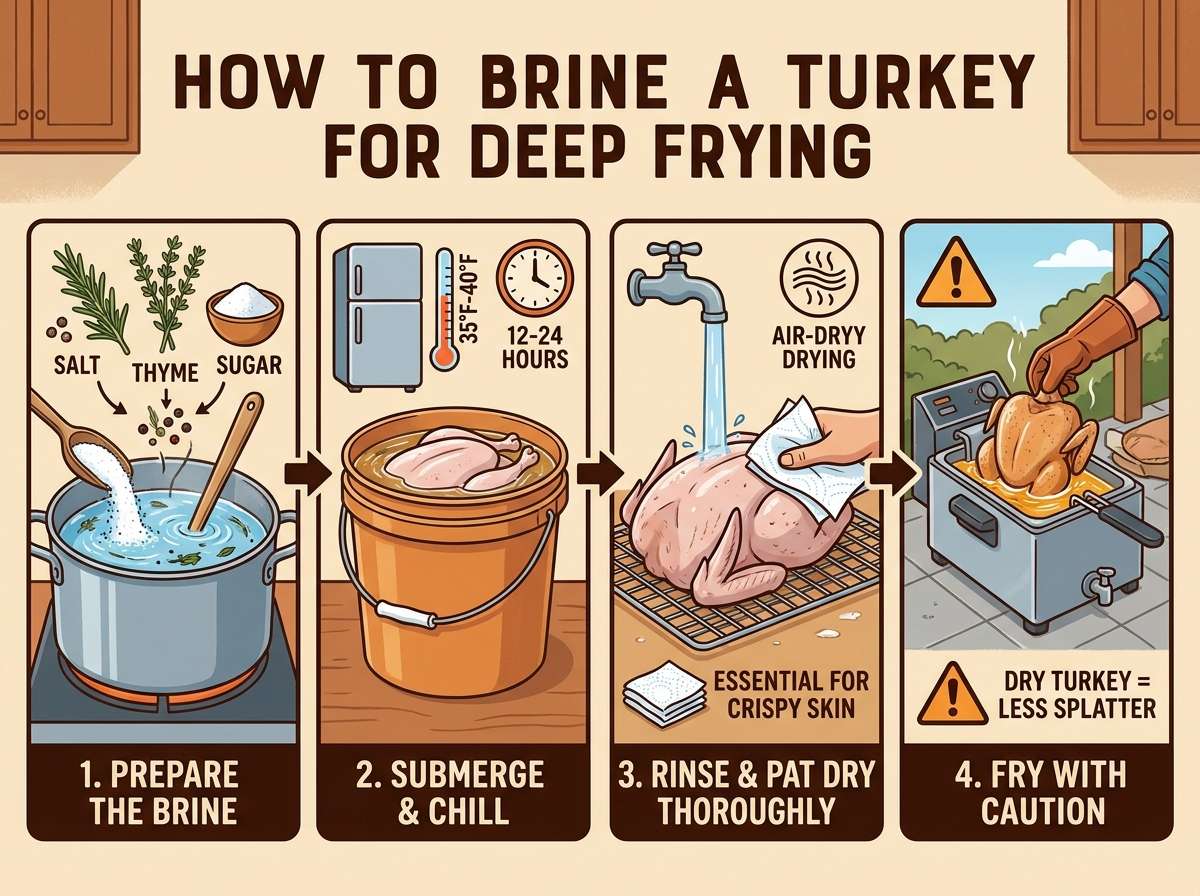
In a large pot, combine water with kosher salt, at a ratio of about 1 cup of salt per gallon of water. Add a half cup of sugar per gallon to balance the saltiness. Heat the mixture just enough to dissolve the salt and sugar completely, then add your aromatics like garlic, peppercorns, bay leaves, and citrus slices.
Let this mixture cool completely before it touches the turkey. Adding a warm brine to raw meat pushes it into the temperature danger zone, so patience here matters.
Step 3: Submerge the Turkey
Place the turkey breast-side down in your container or bag. Pour the cooled brine over it until the bird is fully covered. If parts of the turkey float above the liquid, weigh it down with a plate or a bag of ice.
Step 4: Brine Time
Keep the turkey in the fridge or a cooler packed with ice for 8 to 24 hours, depending on the size of the bird. A general rule is about 1 hour of brining per pound of turkey, but don’t go past 24 hours since the meat can turn mushy if it sits too long in salt water.
Step 5: Remove and Rinse
Take the turkey out of the brine and rinse it thoroughly under cold water, inside and out. This step removes extra surface salt so the final flavor doesn’t turn overly salty.
Step 6: Dry Completely
This is the step people skip, and it’s the one that matters most for frying safety. Pat the turkey dry with paper towels, then let it air dry uncovered in the fridge for several hours, or even overnight. The skin should feel dry to the touch, not damp, before it goes anywhere near hot oil.
Step-by-Step Dry Brine Method
Step 1: Mix Your Dry Brine
Combine kosher salt with brown sugar, black pepper, garlic powder, onion powder, and any dried herbs you like. A standard ratio is about 1 tablespoon of salt per 4 to 5 pounds of turkey.
Step 2: Apply the Rub
Pat the turkey dry first with paper towels. Then rub the salt mixture all over the skin, inside the cavity, and even under the skin if you can get your hand in there without tearing it. Getting the salt directly on the meat under the skin adds even more flavor.
Step 3: Rest in the Fridge
Place the turkey on a rack set inside a rimmed pan, uncovered, in the fridge. This lets air circulate around the bird while it dries out. Leave it for 12 to 24 hours.
Step 4: No Rinsing Needed
Unlike a wet brine, you don’t need to rinse off a dry brine. The salt has already worked its way into the meat by this point, and the surface should be dry, which is exactly what you want for crispy fried skin.
Step 5: Bring to Room Temperature
Before frying, let the turkey sit out for about 30 to 60 minutes so it isn’t ice cold when it hits the hot oil. A cold bird straight from the fridge can cause the oil temperature to drop too fast and lead to uneven cooking.
Getting the Turkey Fully Dry Before Frying
No matter which brine method you use, drying the turkey completely before frying is the most important safety step in this whole process. Water and hot oil don’t mix, and even a small amount of moisture can cause violent splattering the moment the bird touches the oil.
Here’s how to make sure your turkey is truly ready:
- Pat every surface dry with paper towels, including inside the cavity
- Let the bird air dry uncovered in the fridge for at least a few hours
- Check the skin right before frying, it should feel tacky and dry, never wet
- Avoid stuffing the cavity with anything wet, like fresh herbs soaked in liquid
Take your time here. Rushing this part is where most frying accidents happen.
Tips for Better Flavor
If you want your fried turkey to taste like more than just salt, try these ideas:
- Add citrus peel like orange or lemon to your wet brine for a bright note
- Toss in whole spices such as allspice berries, cloves, or mustard seed
- Use apple cider or beer in place of some of the water in a wet brine for extra depth
- Rub softened butter or oil mixed with herbs under the skin after brining, before frying
- Inject a marinade into the thickest parts of the breast and thighs after the bird is dry, right before frying
These extra touches build layers of flavor that go beyond basic salt and pepper.
Common Mistakes to Avoid
Even experienced cooks slip up on a few key points. Watch out for these:
Skipping the drying step. This is the biggest one. A wet turkey and hot oil is a dangerous combination that can cause serious burns.
Using too much salt. More salt doesn’t mean more flavor, it means an overly salty bird. Stick to the ratios above and don’t eyeball it.
Brining too long. Leaving the turkey in a wet brine for days instead of hours can break down the texture and make the meat feel mushy instead of firm.
Adding a warm brine to the turkey. Always cool your brine fully before it touches the meat. A warm brine invites bacteria growth.
Forgetting to thaw the turkey completely. Any ice inside the bird will cause the same splattering issue as excess water. Make sure the turkey is fully thawed, with no frozen spots in the cavity, before you brine or fry it.
Using the wrong salt. Table salt is finer and saltier by volume than kosher salt. If a recipe calls for kosher salt and you swap in table salt using the same measurement, your brine will be far too salty.
Frying After the Brine
Once your turkey is brined and completely dry, you’re ready for the fryer. A few quick reminders for this stage:
- Fry outdoors, away from your house, garage, or any covered structure
- Never leave the fryer unattended once the oil is hot
- Lower the turkey into the oil slowly to avoid splashing
- Use a thermometer to check that the internal temperature reaches 165°F in the thickest part of the thigh and breast
- Let the turkey rest for about 20 minutes after frying before you carve it
Resting matters just as much after frying as brining does before it. This gives the juices time to settle back into the meat instead of running out the second you slice into it.
Frequently Asked Questions
Can I brine a turkey that’s already been injected with a saline solution? Check the label first. Many pre-brined or “enhanced” turkeys already contain added salt water. If yours is labeled this way, skip the brine entirely or you’ll end up with an overly salty bird.
How big of a turkey can I safely deep fry? Most home fryers handle turkeys up to about 14 pounds comfortably. Bigger birds need more oil and a bigger pot, and they take longer to cook evenly.
Do I need to brine at all if I’m short on time? A dry brine, even for just a few hours, is better than no brine at all. If you’re really pressed for time, a heavy salt rub applied 30 minutes before frying still adds some surface flavor, though it won’t reach as deep into the meat.
Is it safe to reuse brine liquid? No. Once raw turkey has sat in the brine, throw the liquid out. Reusing it risks spreading bacteria.
Can I brine a turkey in a plastic bag instead of a container? Yes, as long as it’s a heavy-duty, food-safe bag with no leaks. Double-bagging adds extra insurance against spills in your fridge or cooler.
Final Thoughts
Brining a turkey for deep frying isn’t complicated once you break it down into steps. Pick a method that fits your schedule, whether you have time to soak the bird overnight in a wet brine or you’d rather rub on a dry brine and let the fridge do the work. Either way, the payoff is a turkey with deep flavor and a texture that stays tender even under hot oil.
The one rule that never changes: dry the turkey completely before it goes anywhere near the fryer. Get that part right, follow safe frying practices, and you’ll end up with a golden, crispy bird that tastes as good on the inside as it looks on the outside.

Mary is a home cooking enthusiast and kitchen appliance reviewer who loves helping people find the best tools for everyday meals. She enjoys testing air fryers, deep fryers, and other cooking appliances while sharing honest reviews and practical buying advice. Through FryerPick.com, Mary provides expert guides, product comparisons, and cooking tips to help readers choose the right fryer for their kitchen.