How to Deep Fry Chicken?
Deep fried chicken is one of those dishes that makes people smile. The golden, crispy outside paired with juicy, tender meat inside is simply hard to beat. Many folks think deep frying chicken at home is too hard or risky. The truth? It’s way easier than you think. This guide will walk you through everything you need to know to make perfect fried chicken at home.
In this article
Why Deep Fry Chicken at Home?
Making fried chicken in your own kitchen has real benefits. Store-bought fried chicken can be expensive. One meal costs what you’d spend on several meals of homemade versions. Plus, you control every ingredient. You know exactly what goes into your food.
The taste is better when it’s fresh. Restaurant chicken sits under heat lamps. Your chicken comes straight from the oil to your plate. The crispy coating stays crispy longer. You can adjust the spices to match what you like. Too salty at the store? Make it less salty. Want more flavor? Add what you want.
There’s also something fun about making fried chicken yourself. Kids love being part of the process. Adults enjoy the satisfaction of eating something they made. Best of all, it impresses guests without much effort.
What You’ll Need to Get Started
Before you start frying chicken, gather your tools and gear. You don’t need special equipment. Most things are probably in your kitchen right now.
The Essential Equipment
A heavy-bottomed pot is your best friend for frying. Cast iron works great. A Dutch oven is ideal. These hold heat evenly. They keep temperature steady. Avoid thin pots because they heat up in hot spots.
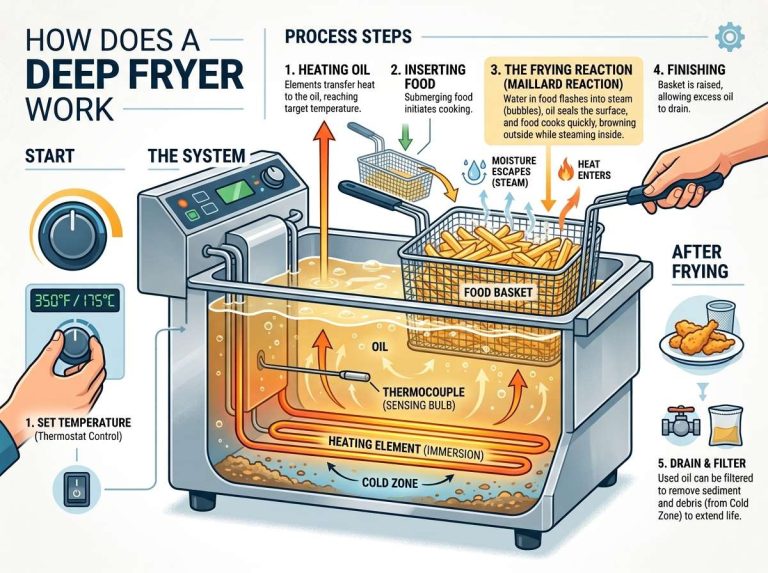
A thermometer is not optional. Buy a candy thermometer or an instant-read meat thermometer. You need to know the oil temperature. Too cold and your chicken gets greasy and soggy. Too hot and the outside burns before the inside cooks. The right temperature is the secret to success.
Get a long-handled slotted spoon or spider strainer. This tool lets you lower chicken safely into hot oil. It also helps you flip pieces without splashing. Never use regular kitchen tongs because they pinch and tear the coating.
You’ll need tongs for handling raw chicken. Separate tongs work best. Use one pair for raw chicken and one for cooked chicken. This stops bacteria from spreading.
Paper towels are essential. You need them to dry the chicken before it goes in oil. Wet chicken causes dangerous oil splatters. Paper towels also help drain oil from cooked pieces.
A wire rack placed over a baking sheet is perfect for draining. The rack keeps oil away from the chicken so it stays crispy.
The Ingredients You’ll Use
The ingredients list is short and simple. You probably have most items at home already.
Chicken pieces are the star. You can use breasts, thighs, drumsticks, or wings. Dark meat stays juicier. White meat cooks faster. Whole cut-up chickens work best for mixed results.
All-purpose flour is your base for breading. Some folks add cornstarch to the flour. This makes the crust extra crispy. A ratio of one-quarter cornstarch to three-quarters flour works great.
Salt and pepper are must-haves. Garlic powder, onion powder, and paprika add flavor. Cayenne pepper brings heat. Dried herbs like thyme and oregano work too. Use what you like.
Buttermilk is the secret weapon. It keeps meat tender. It helps seasoning stick to the chicken. If you don’t have buttermilk, add lemon juice to regular milk. Let it sit for five minutes.
You need oil for frying. Vegetable oil works well. Peanut oil has a higher smoke point. Canola oil is budget-friendly. Avoid olive oil because it burns easily. You’ll need about two to three quarts depending on your pot size.
Picking the Right Chicken
The quality of your chicken matters. Fresh chicken is best if you can get it. Thaw frozen chicken in the fridge overnight, not on the counter.
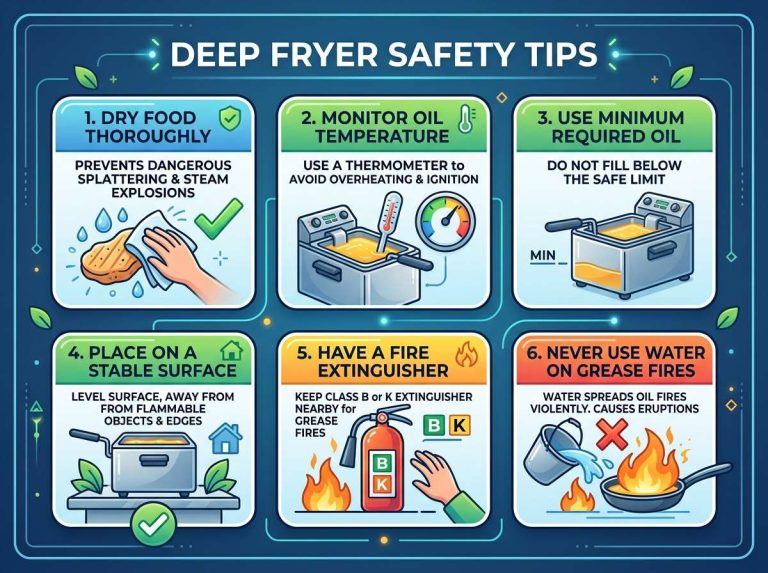
Dry your chicken very well before coating. Pat it down with paper towels. Remove all surface moisture. Water and hot oil don’t mix well. They create dangerous splatters.
Let chicken come to room temperature before frying. Cold chicken takes longer to cook. The outside burns while the inside stays cold. Leave it out for thirty minutes before you start.
For the best texture, use bone-in, skin-on pieces. The bones help meat cook evenly. The skin adds extra flavor and crispiness.
Making Your Seasoning Mix
The coating is where flavor happens. Don’t skip this step.
Combine your dry ingredients in a shallow dish. One cup of flour mixed with one teaspoon of salt works as a base. Add half a teaspoon of black pepper. Add one teaspoon of garlic powder and half a teaspoon of onion powder.
For extra flavor, add one teaspoon of paprika. If you like spice, add one-quarter to one-half teaspoon of cayenne pepper. Adjust based on how spicy you like things.
Mix everything well. Make sure clumps of seasoning don’t sit in the flour. Even distribution matters.
You can make this mix ahead of time. Store it in a jar. When you’re ready to fry, dump it in a shallow dish.
The Wet and Dry Method
This is the classic way to coat fried chicken. It creates layers that make the crust super crispy.
Pour buttermilk into one shallow dish. Pour your seasoned flour into another dish. The buttermilk should be deep enough to coat a piece fully.
Take one piece of chicken. Dip it in buttermilk. Make sure it’s covered completely. Let excess drip off. Don’t leave it swimming in liquid.
Place the wet chicken into the flour. Coat all sides well. Pick it up and shake off extra flour. The chicken should have a thin, even coating, not a thick layer.
Place coated chicken on a clean plate. Don’t stack pieces on top of each other. If you do this, the bottom gets soggy. Space them out on the plate.
Some folks let coated chicken rest for ten minutes. This helps the coating stick better during frying. It’s optional but recommended.
Getting Your Oil Ready
Oil temperature controls everything. This is the most important step.
Pour oil into your pot. You need enough to cover chicken halfway. Fill it about one-third to one-half full, depending on your pot size.
Heat the oil slowly. Place your thermometer in the oil. Watch as the temperature rises. Don’t rush this. Gradual heating is safer.
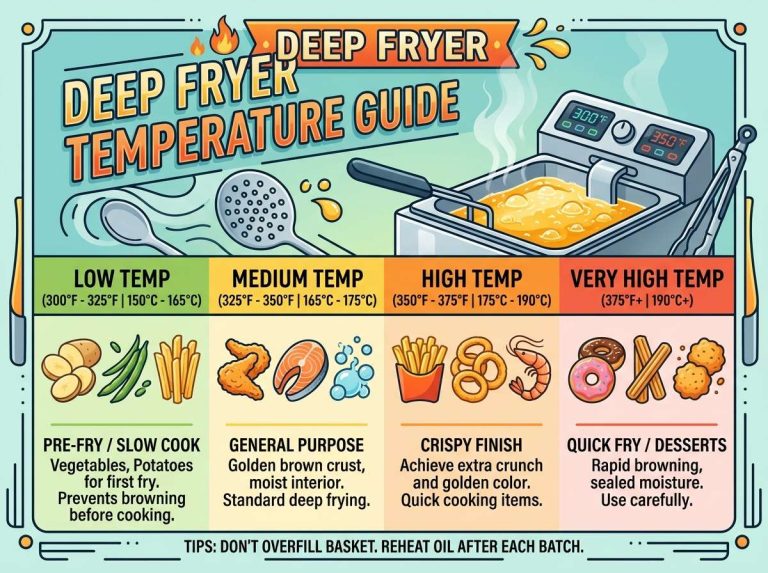
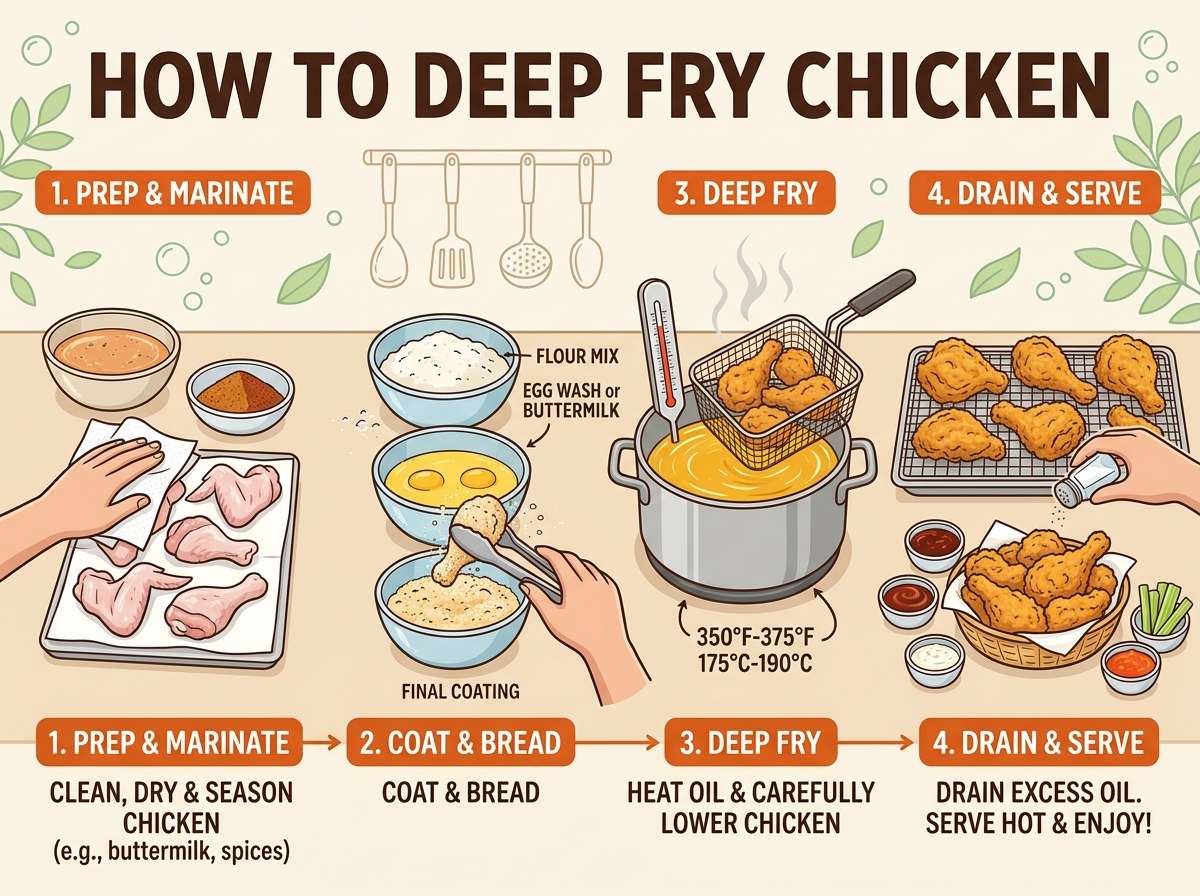
The target temperature for chicken frying is three hundred fifty degrees. Some recipes say three hundred twenty-five degrees. Others go up to three hundred seventy-five degrees. Three hundred fifty is the sweet spot for most home cooks.
Never leave hot oil unattended. Don’t turn your back to answer the phone. Don’t step away to grab something you forgot. Stay in the kitchen.
Test the oil temperature with a small piece of bread. If it turns golden in about sixty seconds, you’re at the right heat. If it burns too fast, cool the oil. If it browns too slowly, heat it more.
The Frying Process: Step by Step
Now comes the exciting part. This is where your raw chicken becomes delicious fried chicken.
Carefully place chicken pieces into hot oil. Use your long-handled slotted spoon. Don’t drop them from high up. This causes splashing and burns. Lower them gently into the oil.
Work in batches. Don’t crowd the pot. Pieces need space to cook. Overcrowding drops oil temperature. It also creates uneven cooking. Usually, you can fit four to six pieces at a time depending on pot size.
Let chicken cook without moving it for the first minute. This helps the coating set. After one minute, you can flip if needed.
The total cooking time varies by piece size. Small pieces like wings take ten to twelve minutes. Medium thighs and drumsticks take twelve to fifteen minutes. Large breasts take fifteen to eighteen minutes.
The chicken is done when a meat thermometer reads one hundred sixty-five degrees in the thickest part. Don’t rely on color alone. Some pieces brown fast while staying raw inside.
Lift chicken out with your slotted spoon. Place it on your wire rack over a baking sheet. Let oil drain for a minute. Then move to paper towels for additional draining.
Bring oil back up to three hundred fifty degrees before adding the next batch. This takes a few minutes. Don’t rush it.
Common Mistakes to Avoid
Even simple tasks have pitfalls. Learn what goes wrong so you can avoid it.
Oil that’s too cool is the biggest problem. Cold oil makes greasy, soggy chicken. The coating absorbs oil instead of crisping up. Chicken cooked this way tastes like an oil sponge. Always check your temperature.
Crowding the pot drops oil temperature fast. Pieces steam instead of fry. You end up with pale, mushy chicken. Cook smaller batches and wait for oil to reheat between batches.
Wet chicken causes oil to splatter everywhere. Dry your pieces completely with paper towels. This simple step prevents accidents and burns.
Moving chicken too often stops the coating from crisping. Let it cook undisturbed for the first minute. After that, flip it only once.
Using the wrong oil matters. Olive oil burns at low temperatures. Butter burns too. Coconut oil has a weird flavor. Stick to neutral oils with high smoke points.
Overcooking dries out the meat. Large pieces especially need to stay juicy inside. Use a thermometer to stop guessing. One hundred sixty-five degrees is perfect.
Not seasoning the chicken enough is a missed chance. Season the raw chicken before coating. Add salt and pepper directly to pieces. Then coat with your flour mix.
Getting the Golden Crust Just Right
The crust is why people love fried chicken. Here’s how to make it perfect every time.
The buttermilk soak is crucial. It tenderizes the meat. It also helps seasoning stick to the surface. Don’t skip this step.
Double coating works wonders. Dip coated chicken back in buttermilk for a second. Then coat in flour again. This creates extra layers. Extra layers mean extra crunch.
A little cornstarch in your flour mix adds crispiness. Use one-quarter cup cornstarch and three-quarter cup flour. This ratio works great.
Some cooks add a touch of baking powder to flour. This creates extra lightness in the crust. Use one-quarter teaspoon per cup of flour.
Let coated chicken sit for ten to fifteen minutes before frying. The flour gets time to stick. The coating doesn’t fall off as easily during cooking.
The oil temperature must stay at three hundred fifty degrees. This creates the golden color and crispy texture. Too hot and it burns. Too cold and it’s pale and greasy.
Seasoning Your Fried Chicken
Flavor comes in multiple ways. Season at different stages for best results.
Season raw chicken pieces with salt and pepper. Rub it directly on the meat. This seasons inside, not just the coating.
Mix your coating flour with plenty of spices. Don’t be shy with seasoning here. The coating is where taste happens.
Some folks add hot sauce or spicy seasoning to buttermilk. This adds flavor directly to the meat. It’s optional but delicious.
After frying, sprinkle a bit of salt on hot chicken. It sticks to moisture on the surface. It adds flavor right where you taste it.
Fresh herbs like parsley or green onions make nice garnishes. Add them after chicken drains. They add freshness and color.
Serve with dipping sauces for extra flavor. Hot sauce, ranch, honey mustard, or barbecue sauce all work great.
Different Flavors and Styles
Once you master basic fried chicken, experiment with different flavors.
Spicy Fried Chicken
Add cayenne pepper to your flour mix. Start with one-quarter teaspoon and adjust up. Add hot sauce to the buttermilk. Use hot paprika instead of regular paprika. Serve with ranch for cooling relief.
Herb-Crusted Chicken
Mix dried herbs into your flour. Thyme, oregano, and basil all work. Use one teaspoon of herbs per cup of flour. This creates a more sophisticated flavor.
Garlic and Parmesan
Double your garlic powder. Add one-quarter cup of grated Parmesan cheese to your flour. This creates a savory, rich crust. Serve with marinara sauce for a fun twist.
Honey Soy Style
Make a simple glaze with honey, soy sauce, and garlic. Brush it on cooked chicken. The glaze caramelizes in the residual heat. It adds sweet and savory notes.
Lemon Pepper
Use lots of black pepper in your flour. Add lemon zest too. Squeeze fresh lemon juice over cooked chicken. This makes it bright and fresh.
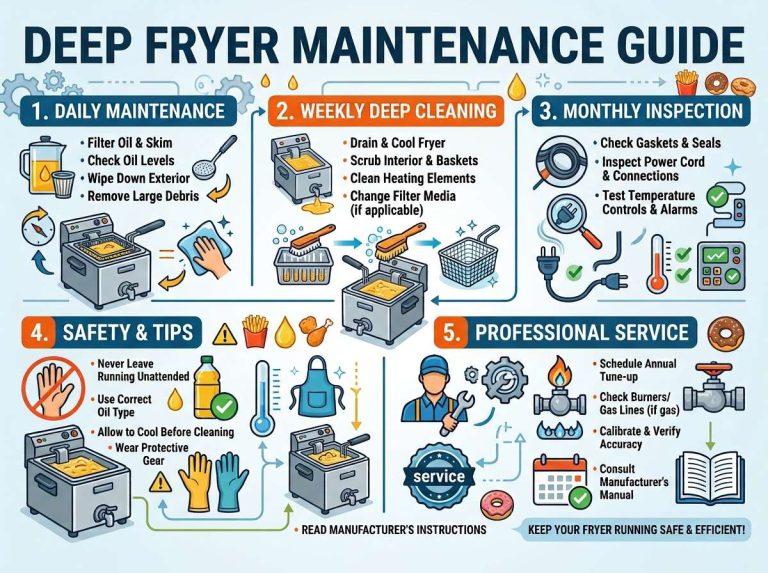
Equipment Care and Safety
Taking care of your equipment makes it last longer. It also keeps you safe.
Let oil cool completely before disposing. Hot oil causes serious burns. Once cool, pour it through a fine strainer into a jar. You can reuse oil several times.
Never pour grease down the sink. It hardens in pipes and causes clogs. Let it cool and toss it in the trash or a container.
Keep your thermometer clean between uses. Wash it with warm soapy water. Dry completely to prevent rust.
Store your pot away from moisture. Cast iron needs special care. After washing, dry it completely. Store in a dry place.
Never leave hot oil unattended. This is the golden rule of frying. Oil fires are dangerous. If oil catches fire, turn off the heat. Never use water on an oil fire. Cover with a baking sheet to suffocate flames.
Keep a fire extinguisher in your kitchen. Know where it is. Know how to use it.
Storing Leftover Fried Chicken
Proper storage keeps chicken fresh and safe.
Eat fried chicken within two hours at room temperature. Any longer and bacteria grow. If you can’t eat right away, refrigerate immediately.
Refrigerate cooked chicken in an airtight container. It lasts three to four days in the fridge.
Cool chicken completely before freezing. Put it in a freezer bag or airtight container. Squeeze out extra air. Frozen fried chicken lasts two to three months.
Reheat in a four hundred twenty-five degree oven for ten to fifteen minutes. This revives crispiness better than microwaving. The microwave makes it soggy.
Want it extra crispy after reheating? Fry it briefly in hot oil. Just thirty seconds per side. This brings back the original texture.
Health Considerations
Fried chicken isn’t a health food. But you can make smarter choices.
Chicken thighs and drumsticks have more fat. Breasts are leaner. If you want less fat, use more white meat pieces.
Removing skin before eating cuts fat significantly. You miss some flavor, but it’s still delicious.
The oil you choose matters. Peanut oil has more healthy fats than some options. Canola oil is a decent choice too.
Don’t fry every day. Make it an occasional treat. Your body will thank you.
Balance fried chicken with plenty of vegetables. Serve with a salad. Eat coleslaw on the side. Fresh fruit for dessert helps too.
Portion control matters. One or two pieces is a reasonable serving. Pair with other foods instead of eating it alone.
Troubleshooting Common Problems
Sometimes things don’t go perfectly. Here’s how to fix common issues.
Soggy, Greasy Chicken
The oil was too cool. Make sure it reaches three hundred fifty degrees. Use a thermometer every time.
Pale, Undercooked Chicken
Oil temperature was still too low. Or you cooked too many pieces at once. Do smaller batches. Always check temperature.
Burned Coating, Raw Inside
Oil was too hot. Or you overcooked the chicken. Use one hundred sixty-five degrees as your target temperature. Trust your thermometer.
Coating Falls Off
Your chicken was too wet before coating. Dry it completely with paper towels. Let coated chicken rest ten minutes before frying.
Uneven Browning
You’re overcrowding. Do smaller batches. Also make sure pieces are similar sizes so they cook at the same rate.
Oil Splashing Everywhere
Chicken is too wet. Or you’re dropping it from too high. Dry chicken well. Lower pieces gently into oil using your slotted spoon.
Making Crispy Fried Chicken Every Single Time
The keys to success are simple but important.
Dry your chicken. Wet chicken causes splashing and soggy results. Use paper towels. Be thorough.
Check your oil temperature with a thermometer. Three hundred fifty degrees is the target. This single step changes everything.
Use buttermilk for soaking. It tenderizes meat and helps coating stick.
Season generously. Don’t fear salt and spices. Taste comes from seasoning.
Work in small batches. Give pieces room to float. This ensures even cooking.
Let coated chicken rest before frying. This helps the coating stick and crisp up better.
Use a slotted spoon for lowering chicken. Gentle is better than fast. Safety comes first.
Don’t flip too much. Once is usually enough. Let that first side set for a minute before flipping.
Test doneness with a thermometer. One hundred sixty-five degrees in the thickest part means it’s done.
Drain on a wire rack, not paper towels alone. This keeps the bottom from getting soggy.
Add salt right after cooking while it’s hot. It sticks better and tastes better.
Serve immediately. Fried chicken is best hot and crispy. Every minute it sits, it loses its crunch.
Final Thoughts
Making fried chicken at home is easier than you think. You don’t need fancy equipment or advanced cooking skills. Just follow the steps. Pay attention to oil temperature. Use good ingredients. Season well.
The first time you pull a batch of golden, crispy chicken from the oil, you’ll know why this dish is so beloved. Your friends and family will ask for your recipe. You’ll be proud of what you made.
Start simple. Use basic seasonings. As you get comfortable, experiment with flavors. Try different spice blends. Make it your own.
The best part? Homemade fried chicken tastes better and costs less than takeout. It impresses people. It brings joy to the table. That’s why this simple dish has stayed popular for so long.
Now you have all the knowledge you need. You know what equipment to use. You understand how to prep chicken. You can follow the frying process step by step. You can avoid mistakes. You can fix problems if they happen.
Get some chicken. Buy your oil and flour. Clear an afternoon. Make fried chicken. Enjoy the process and the results. You’ve got this.
Mary is a home cooking enthusiast and kitchen appliance reviewer who loves helping people find the best tools for everyday meals. She enjoys testing air fryers, deep fryers, and other cooking appliances while sharing honest reviews and practical buying advice. Through FryerPick.com, Mary provides expert guides, product comparisons, and cooking tips to help readers choose the right fryer for their kitchen.